Friday 24 May 2013

Know Your Directory Structure of an Android Project

For Android Application Development we generally use Eclipse IDE. When You create a new Android project in Eclipse It create a Project Directory with  some predefined folders and files. In that project Directory mostly time we  use src,res, assets folder and its sub folder and files for  development. But we did not pay more attention on some of file which we did not use generally during project development. As for example progurd-project .txt and project.propertise.
 Here I am going to explain  Android Project directory with all folders and files. At  First Look on this Image of Project directory

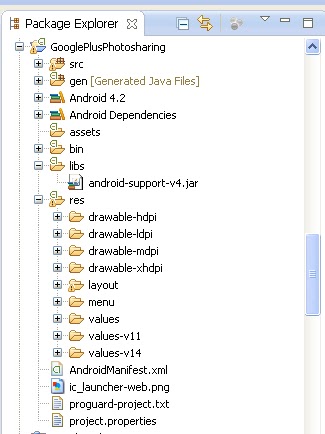
Now I am going to  explain  each folder one by one .
1. src/
Contains your stub Activity file, which is stored at src/your/package/namespace/ActivityName.java. All other source code files (such as .java or .aidl files) go here as well.
2. gen/
The gen directory in an Android project contains auto generated files. You can see R.java inside this folder which is a generated class which contains references to certain resources of the project. R.java is automatically created by the Eclipse IDE and any manual changes are not necessary
3. assets/
This is empty. You can use it to store raw asset files. Files that you save here are compiled into an .apk file as-is, and the original filename is preserved. You can navigate this directory in the same way as a typical file system using URIs and read files as a stream of bytes using the AssetManager. For example, this is a good location for textures and game data.
4. bin/
Bin folder is the area used by the compiler to prepare the files to be finally packaged to the application’s APK file. This includes
  • Compiling your Java code into class files
  • Putting your resources (including images) into a structure to be zipped into the APK
This is the output directory of the build. This is where you can find the final .apk file and other compiled resources.
5. libs/
External library files will be placed in this folder. If you want to any external library in your project place the library jar inside this folder and it will be added to the classpath automatically.
6. res/
Android supports resources like images and certain XML configuration files, these can be keep separate from the source code. All these resources should be placed inside the res folder. This res folder will be having sub-folders to keep the resources based on its type. This is the following sub-folder of this res folder.
  • drawable/
  • layout/
  • menu/
  • values/
You can also create some more sub-folder here to use some more specific resource like
  • anim/
  • color/
  • raw/
  • xml/
Explanation
Drawable
folders are resource directories in an application that provides different bitmap files (PNG, JPEG, or GIF), 9-Patch image files drawables for medium, high, and extra high density screens.
/res/drawable-mdpi - bitmap for medium density
/res/drawable-hdpi - bitmap for high density
/res/drawable-xhdpi - bitmap for extra high density
/res/drawable-nodpi - bitmap with no pre-scaling
layout 
XML files that are compiled into screen layouts (or part of a screen). A layout resource defines the architecture for the UI in an Activity or a component of a UI. These are resource directories in an application that provides different layout designs for different screen sizes
/res/layout - layout for normal screen size or default
/res/layout-small - layout for small screen size
/res/layout-large - layout for large screen size
/res/layout-xlarge -layout for extra-large screen size
/res/layout-xlarge-land - layout for extra-large in landscape orientation
/res/layout-sw600dp - layout for tablets or layout for 7” tablets (600dp wide and bigger)
/res/layout-sw720dp - layout for 10” tablets (720dp wide and bigger)
/res/layout-w600dp - layout for Multi-pane (any screen with 600dp available width or more)
menu 
This folder contains menu resources to be used in the application (Options Menu, Context Menu, or submenu)
Values
It is Used to define strings, colors, dimensions, styles and static arrays of strings or integers. By convention each type is stored in a separate file, e.g. strings are defined in the res/values/strings.xml file.
Here you can change the String variables in  different language to chage your entire application for that Language  So it is advisable to define all your string variable here.
/res/values-v11 is the values of the API version 11, and
 /res/values-v14 is the values of the API version 14
anim
This folder contains animations in XML for the property animation API which allows to animate arbitrary properties of objects over time.
color
For XML files that describe colors
raw
For arbitrary raw asset files. Saving asset files here instead of in the assets/ directory only differs in the way that you access them. These files are processed by aapt and must be referenced from the application using a resource identifier in the R class. For example, this is a good place for media, such as MP3 or Ogg files.
xml
For miscellaneous XML files that configure application components. For example, an XML file that defines a PreferenceScreen, AppWidgetProviderInfo, or Searchability Metadata. See Application Resources for more information about configuring these application components.
7. AndroidManifest.xml
All the android applications will have an Android Manifest.xml file in the root directory. This file will contain essential information about the application to the Android system, information the system must have before it can run any of the application's code. This control file describes the nature of the application and each of its components. In this manifest file you can define your activity, services, premission and SDK version  etc. 
8. ic_launcher-web.png
This is an icon to be used in Google play. Applications on Google Play require a high fidelity version of the application icon. It is not used in your actual app or the launcher, so it is not packaged in the APK.. The specifications for the high-resolution icon are:
32-bit PNG with an alpha channel
512 x 512 pixels
Maximum size of 1024KB
9. proguard-project.txt
Everything in the proguard-project.txt file will be in commented out state, because in general most people don't have any project specific needs, just to run ProGuard tool with standard settings.
The ProGuard tool shrinks, optimizes, and obfuscates your code by removing unused code and renaming classes, fields, and methods with semantically obscure names. The result is a smaller sized .apk file that is more difficult to reverse engineer.
10. project.properties
project.properties is the main project’s properties file containing information such as the build platform target and the library dependencies has been renamed from default.properties in older SDK versions. This file is integral to the project.
That is  all about Android eclipse project directory structure......
In next Post I will  describe in depth for two file proguard-project.txt and project.properties . this is the less use file by many developer but it is extremely useful to secure and customize your APk file. 
Thanks Happy Coding !!!

Tuesday 14 May 2013

Understanding the Android Source code Compilation and Build Process

  • The Android Sourcecode Compilation or  build process involves many tools and processes that generate intermediate files on the way to producing an .apk.
  •  If you are developing in Eclipse, the complete build process is automatically done periodically as you develop and save your code changes.
  •  If you are using other IDEs, this build process is done every time you run the generated Ant build script for your project. 
  • It is useful, however, to understand what is happening under the hood since much of the tools and processes are masked from you.    
I am going to provide  a detail insight view  of this compilation and build  process. Here is  the flow chart of Build process in android
 Step 1: - 
Build process start  in android from the generation of Java source files from your Android resources. The resources, stored in the res sub-directory  include such things as icons, layouts and strings. These are compiled using the aapt tool into a file named R.java, stored in the gen/ sub-directory. if you look on that R.java file you find there a bunch of constant.
Step 2:- 

Service Interface Pre-compilation
The second build step also involves generation of Java source. If your project uses any service interfaces, you need to include the service interface definition files (which have an .aidl extension) in your project. These files superficially resemble normal Java interfaces:
1
2
3
4
5
6
package com.sks.android.myapp;
interface implementedService
{
    String echo(in String s);
}


The aidl tool is used to generate actual Java interfaces for these services. The Java source files will have the same name as the input files (with the .aidl extension replaced by .java) and are created in the gen/ subdirectory. These generated sources serve as a basis for us to implement or call the service interfaces in our own code.
Step 3:- 

Java Compilation
After the two pre-compilation steps, our project’s Java code is complete and ready to be compiled itself. This step is a standard Java compilation from .java source files (both hand-crafted and generated) to .class byte-code files. The binary byte-code files are stored in the bin/classes sub-directory.

One thing to be aware of is the classpath used to compile your source. This includes:

  • The android.jar file for your target Android platform. This jar includes class and method stubs for all of the Android APIs.
  • External library jars you have added to your project (all .jar files in the libs/ subdirectory).
  • For test projects only: the class files and external libraries for the tested project.


Step 4:-
This the main step where something happen new. The dance of Dex tool !!!  Yes ...

After compilation, We have standard Java bytecode, which would run on a standard Java VM. However, Android uses its own Dalvik VM, which requires a different bytecode format. Thus, after compilation, the dx tool is used to translate/convert your class files into a Dalvik executable or .dex file. This includes the class files stored in any external library jars you have added to your project. All classes are package up in a single output file, named as .dex, which is produced in the bin/subdirectory.
Step 5:-
Next, the resources are compiled into a partial Android package file. This is done by the same aapt tool that generates Java source corresponding to the resources. The resource package is created, named after our application with an ap_ suffix in the bin directory. We can use unzip to take a peek inside the package:
1
2
3
4
5
6
7
8
9
saurabh@caligula:~/work/my-app/build$ unzip -t MyApp.ap_
Archive:  MyApp.ap_
    testing: res/layout/main.xml      OK
    testing: AndroidManifest.xml      OK
    testing: resources.arsc           OK
    testing: res/drawable-hdpi/icon.png   OK
    testing: res/drawable-ldpi/icon.png   OK
    testing: res/drawable-mdpi/icon.png   OK
No errors detected in compressed data of MyApp.ap_.

Note that although icon and layout files are included at their original location, they have been processed during packaging (presumably for more efficient storage and/or processing). The icons appear to be optimized but still valid images, whereas layout XML files are converted to a binary format. Strings are compiled into the binary resources.arsc file.
Step 6:-
Now all of the components required for the final Android package are ready to be bundled up into an apk file named after our application. In the default debug mode, this build step also includes signing of the package with a debug key. Note that for release, signing is a separate step that requires access to our own key (and may prompt for a password). Android packages are assembled with the apkbuidler tool, which takes input from several sources:


  • The Dalvik executable file bin/classes.dex.
  • All non-Java resources from your source directory (src/).
  • All non-Java resources from your external libraries (found by searching all .jar files in the libs/ subdirectory).
  • Any native code shared-libraries included by your project.
  • The resource package built in the previous step.


The produced package will be placed in the bin/ subdirectory, named something like MyApp-debug-unaligned.apk.
Step 7:-

Alignment
As a final optimisation step, the package file is aligned using the zipalign tool. This step ensures that resources in the package file are aligned on 4-byte word boundaries. This allows the Dalvik VM to memory-map those parts of the file for more efficient access. You can read more about alignment on the Android Developers Blog. This step takes the -unaligned package as input, and produces an output something like bin/MyApp-debug.apk. This is the final, signed, aligned Android package — ready to be installed on an Android device!
For More Detail You can visit following link:-

http://developer.android.com/guide/components/aidl.html


Friday 10 May 2013

Handling Orientation in Android

There is a advantage in mobile device that it can change there orientation. It depends upon user wish that in which mode(Landscape or Portrait) he want to view your application.So it is become necessary for you to set GUI(graphics/layout)of your application in  both mode so that user can feel the charm of both mode.


    Some time It become typical/ hectically   for developer to put both mode(Landscape and Portrait) design in there application. the reason  is one of the following:- 
  • Due Data pull/push(from local database/Server side DB)
  • Rich content of image and graphics
  • Hardware related Application(Camera, Bluetooth ,etc)
Actually when a user change his portable device screen from Landscape to Portrait or vice-versa  Android activity call oncreate() method to show the content of activity every time . So In the above mention scenario it become delay  to show the content of screen .Hence  in this case we  can use one of the following tactics to overcome this problem.
Approach No 1. 
Lock Screen Orientation Using Manifest File

To block Android Activity from rotating on screen orientation change,We can  add android:screenOrientation ("portrait" or "landscape") field into the <activity> element,
just like this Example

   <activity
        android:name="com..sks.recognition.MyActivity"
        android:screenOrientation="portrait"
        android:theme="@android:style/Theme.Black.NoTitleBar" />


This is the simplest way to block the screen orientation change . The main draw back of  this is that it fixed the mode of Screen orientation  That means User have to forcefully open your app in the given mode. So it is not dynamic. it is rigid way to solve the problem
Approach No.2.
You can check the orientation of screen during the app(activity) start and then lock it to change from other screen orientation   As for Example if user open his app in Portrait mode then if he want to change in landscape mode then it not happen at that time. Same way if user open it app in landscape mode then data shown at this time in landscape mode but it not change again in Portrait mode. Use following condition


int prevOrientation = getRequestedOrientation();
    if(getResources().getConfiguration().orientation == Configuration.ORIENTATION_LANDSCAPE) {
        setRequestedOrientation(ActivityInfo.SCREEN_ORIENTATION_LANDSCAPE);
    } else if(getResources().getConfiguration().orientation == Configuration.ORIENTATION_PORTRAIT) {
        setRequestedOrientation(ActivityInfo.SCREEN_ORIENTATION_PORTRAIT);
    } else {
        setRequestedOrientation(ActivityInfo.SCREEN_ORIENTATION_NOSENSOR);
    }
    setRequestedOrientation(prevOrientation);

This is better approach than Approach no1, because it is dynamic as compare to first approach. User can view your application in both screen mode(Landscape and Portraits ).
Approach No.3.
This is the pure dynamic approach to show the application in both screen mode(Landscape and portrait).

Coming Soon !!!1...


Wednesday 1 May 2013

Set Live Frame on Camera Capturing Image in Android

Hi Guys,
Hope All of You Doing Well.
Here I am going to show you how to put live Photo Frame on Android Camera. Sometime you need to put a fabulous Photo frame during your image captures. It is more interesting to put a Frame during image capture than after image captures. Live frame putting give you a edge over static frame putting because it provide easily adjustment of your image captures.
Here is the code
Create a Android Activity and put it name CameraOverview1 . Copy and paste following code in this class.
public class CameraOverview1 extends Activity implements SurfaceHolder.Callback{

private Camera camera = null;
private SurfaceView cameraSurfaceView = null;
private SurfaceHolder cameraSurfaceHolder = null;
private boolean previewing = false;

private Display display = null;


private static int wid = 0, hgt = 0;

private LayoutInflater layoutInflater = null;
private View cameraViewControl = null;
private LayoutParams layoutParamsControl = null;

private Button btnCapture = null;

@Override
protected void onCreate(Bundle savedInstanceState) 
{
    // TODO Auto-generated method stub
    super.onCreate(savedInstanceState);
    setRequestedOrientation(ActivityInfo.SCREEN_ORIENTATION_LANDSCAPE);

    display = getWindowManager().getDefaultDisplay(); 
    wid = display.getWidth();
    hgt = display.getHeight();

    getWindow().setFormat(PixelFormat.TRANSLUCENT);
    requestWindowFeature(Window.FEATURE_NO_TITLE);
    getWindow().setFlags(WindowManager.LayoutParams.FLAG_FULLSCREEN,WindowManager.LayoutParams.FLAG_FULLSCREEN);

    setContentView(R.layout.cameraoverlay1);

    cameraSurfaceView = (SurfaceView)findViewById(R.id.cameraSurfaceView);
    cameraSurfaceHolder = cameraSurfaceView.getHolder();
    cameraSurfaceHolder.addCallback(this);
    cameraSurfaceHolder.setType(SurfaceHolder.SURFACE_TYPE_PUSH_BUFFERS);

    layoutInflater = LayoutInflater.from(getBaseContext());
    layoutParamsControl = new LayoutParams(LayoutParams.FILL_PARENT,LayoutParams.FILL_PARENT);

    cameraViewControl = layoutInflater.inflate(R.layout.cambutton, null);     
    this.addContentView(cameraViewControl, layoutParamsControl);
btnCapture = (Button)findViewById(R.id.btnCapture);
    btnCapture.setOnClickListener(new OnClickListener() 
    {   
        @Override
        public void onClick(View v) 
        {
            // TODO Auto-generated method stub
            camera.takePicture(cameraShutterCallback, 
                    cameraPictureCallbackRaw,
                    cameraPictureCallbackJpeg);
        }
    });
} 

ShutterCallback cameraShutterCallback = new ShutterCallback() 
{  
    @Override
    public void onShutter() 
    {
        // TODO Auto-generated method stub   
    }
};

PictureCallback cameraPictureCallbackRaw = new PictureCallback() 
{  
    @Override
    public void onPictureTaken(byte[] data, Camera camera) 
    {
        // TODO Auto-generated method stub   
    }
};

PictureCallback cameraPictureCallbackJpeg = new PictureCallback() 
{  
    @Override
    public void onPictureTaken(byte[] data, Camera camera) 
    {
        // TODO Auto-generated method stub   
        Bitmap cameraBitmap = BitmapFactory.decodeByteArray(data, 0, data.length);

        wid = cameraBitmap.getWidth();
        hgt = cameraBitmap.getHeight();

        Bitmap newImage = Bitmap.createBitmap(wid, hgt, Bitmap.Config.ARGB_8888);

        Canvas canvas = new Canvas(newImage);

        canvas.drawBitmap(cameraBitmap, 0f, 0f, null);

        Drawable drawable = getResources().getDrawable
                (R.drawable.frame1);
        drawable.setBounds(0, 0, wid, hgt);
        drawable.draw(canvas);

        File storagePath = new File(Environment.
                getExternalStorageDirectory() + "/MyCameraApp/"); 
        storagePath.mkdirs(); 

        File myImage = new File(storagePath,
                Long.toString(System.currentTimeMillis()) + ".jpg");

        try
        {
            FileOutputStream out = new FileOutputStream(myImage);
            newImage.compress(Bitmap.CompressFormat.JPEG, 80, out);


            out.flush();
            out.close();
        }
        catch(FileNotFoundException e)
        {
            Log.d("In Saving File", e + "");    
        }
        catch(IOException e)
        {
            Log.d("In Saving File", e + "");
        }

        camera.startPreview();

        drawable = null;

        newImage.recycle();
        newImage = null;

        cameraBitmap.recycle();
        cameraBitmap = null;
    }
};

@Override
public void surfaceChanged(SurfaceHolder holder, 
        int format, int width, int height) 
{
    // TODO Auto-generated method stub

    if(previewing)
    {
        camera.stopPreview();
        previewing = false;
    }
    if (camera != null){
        try 
        {
    camera.setPreviewDisplay(cameraSurfaceHolder);
            camera.startPreview();
            previewing = true;
        } 
        catch (IOException e) 
        {
            // TODO Auto-generated catch block
            e.printStackTrace();  
        }
    }
}

@Override
public void surfaceCreated(SurfaceHolder holder) 
{
    // TODO Auto-generated method stub
    try
    {
        camera = Camera.open();
    }
    catch(RuntimeException e)
    {
        Toast.makeText(getApplicationContext(), "Device camera is not working properly, please try after sometime.", Toast.LENGTH_LONG).show();
    }
}

@Override
public void surfaceDestroyed(SurfaceHolder holder) 
{
    // TODO Auto-generated method stub
    camera.stopPreview();
    camera.release();
    camera = null;
    previewing = false;
}}
Now You have to put xml file for GUI in your project. cameraoverlay1.xml
<?xml version="1.0" encoding="utf-8"?>
<LinearLayout xmlns:android="http://schemas.android.com/apk/res/android"
android:layout_width="match_parent"
android:layout_height="match_parent"
android:orientation="vertical" >

<SurfaceView
    android:id="@+id/cameraSurfaceView"
    android:layout_width="match_parent"
    android:layout_height="match_parent"
    android:background="@drawable/frame1" />
</LinearLayout>
and cambutton.xml  in your project layout folder.
<?xml version="1.0" encoding="utf-8"?>
<LinearLayout xmlns:android="http://schemas.android.com/apk/res/android"
android:layout_width="match_parent"
android:layout_height="match_parent"
android:gravity="right"
android:orientation="vertical" >
<Button
    android:id="@+id/btnCapture"
    android:layout_width="wrap_content"
    android:layout_height="wrap_content"
    android:layout_margin="10dp"
    android:background="@drawable/cambutton"
    android:gravity="center_vertical" />
</LinearLayout>                                                            
This is the all source code to put a live photo frame during image captures in Android. This code just putting one simple static frame named as frame1.png, In my next blog i will write a full dynamic code for putting Live frame.Usercan choose Frame image before starting the image    Capture 
Happy Coding Thanks

Build a Custom Kernel Module for Android

Hi Guys!!!Hope you are doing well !!!. Today I will describe how you can write a custom kernel module(Hello world) for Android and load it a...